I am happy to share with you the handful of different ways that I start my dahlia tubers for the gardening season. I hope that this will help provide some insight into the process. This is by no means a complete guide on the way to start your tubers, but these are the methods that work for me. I'm always happy to answer any questions you may have so please feel free to reach out should any arise.
---
GROWING MEDIUM
Let's chat a little bit about growing mediums, because I find this to be one of the things that throws people off as there are so many options out there. You may already have a high quality mix that you prefer, and that's great! Just keep using what works for you and feel free to skip right over this.
I have been using Pro-Mix HP Mycorrhizae to start my plants for so many years that I've lost count. It is a high-porosity peat-based growing medium which makes it ideal for a variety of uses. Pro-Mix BX is another option to consider, it is also a peat-based medium however it contains a much lower percentage of perlite than Pro-Mix HP, meaning that it retains water at greater levels. While I prefer BX for things such as potted vegetables or flower planters on my patio in the summer, I find HP to be the best for seed and plant starting. If you are local to the Saskatoon area, Early's Farm & Garden Center consistently has it in stock and has the best price, beating out big box stores by $10 per bag or bale. (One quick note, if you are looking to purchase it by the bale, the location on 51st Street stores theirs outside so you will have to allow time for it to thaw. If you want to use it straight away, purchase it by the bag or head to the store on Lorne Avenue as their bags and bales are stored indoors.)
Whichever medium you choose to use, you will want to start your tubers in a moistened but not soggy mix. If you compress a handful of the medium, it should hold together when you unclench your fist, but break apart easily with a simple touch.


---
POTTING VESSELS
I use a variety of vessels for starting my dahlia tubers. The time of year, quality of the tuber and space are usually what determine what I will use, garden pots, seed starting trays or plastic storage containers. While each of these items I've listed are made of plastic, it is important to note that they can and should be re-used from year to year. If you do not already have a collection of garden pots and/or trays and don't want to purchase new, it is worth searching for them second-hand on Marketplace, Kijiji, local Facebook gardening groups, or even local garden centers and growers may sell bunches off from time to time. Always make sure you wash and sterilize any secondhand items you use, sanitization is important when it comes to re-using potting vessels to mitigate the spread of bacteria and disease. If you're looking to purchase new items, go for quality plastics that you know will last you many years. My favourite place is again, Early's Farm and Garden Center in Saskatoon, but any local garden center should carry quality products you can source. For plastic storage containers, and sometimes garden products, I find Dollarama to be a great supplier as well.

---
Garden Pots
For garden pots, you won't want anything smaller than 4", some larger tubers will require larger pots. I have an assortment that I've collected over the years from my own houseplant and garden purchases, but I've also bought a lot of my larger plastic pots secondhand from resale sites. If you're buying new, most tubers can manage in a 4" pot, go for square ones instead of round as they fit nicer in garden trays.
I like to fill my pots to half when planting tubers, compacting it ever so slightly. If possible, I lie the tuber on its side on the surface and cover the bulk of the tuber loosely in soil leaving the crown and a portion of the neck exposed. No matter how I plant my tubers, I like to leave the crown and a small portion of the neck exposed to keep an eye on the health of the neck as well eye/bud formation.


You may find at times that a tuber is just too large for the pot to lie on its side. In this case I will simply pop the tuber into the soil, crown pointing to the sky, and fill up with soil to the base of the crown. Depending on how early I start my potted tubers usually determines if I will fill in the pot later on with soil or not. Typically if I start tubers early, February/March, they will need to be potted up a size before being planted in the garden. This, of course, depends on the variety, some are ok hanging out in the 4" pot until planting time.


Sometimes a tuber is just too large for the pots that you have on hand so you need to do a bit of trimming. Don't ever feel bad for cutting a tuber down to a more manageable size, it will survive just fine. Extremely long tubers can be a nuisance to pot and even to plant in the garden. For this step all you will need is a sharp, clean knife and a fungicide to dust on the fresh cut. I use cinnamon as it has natural fungicide and root boosting properties, it's yet to let me down. Oftentimes you will see tubers with cut bottoms, this is often the reason why.


left, a freshly cut and shortened tuber | center, dusted with cinnamon | right, it fits!
Even with a dusting of cinnamon, it is best to let a freshly cut tuber callous over a little before planting. Leaving it exposed to the air for one to two hours should be sufficient, though longer is fine too if you're potting a lot of tubers and get to the cut ones at the very end.
---
Seed Starting/Garden Trays
Seed starting trays are great for starting a large quantity of tubers in a smaller amount of space. Again, go for the thicker, heavy duty trays if you can. They're usually twice as expensive as the standard tray but they're SO much better and will last an incredibly long time. Keep in mind that depending on when you start your tubers, these may need to be potted up if they outgrow the trays before it's safe to plant outdoors.


Starting in seed trays is also great if you're just looking to wake-up your tubers before planting outdoors and aren't necessarily looking for there to be a ton of growth, roots or shoots, before planting outside. This way they can be planted directly from the tray into the garden without the effort of potting them up. This is typically done about 4 to 6 weeks prior to planting them outside, though certain varieties may be more prolific than others and need to be potted up anyways. The advantage to pushing your tubers in storage for as long as possible is that with no exposed shoots, you can likely plant your dahlias in the ground a bit earlier than you would if they were already large plants, forcing you to wait until all threat of frost has past. This method is generally more advantageous to those growing a large amount of tubers or those short on space.
---
Plastic Storage Containers
I use plastic storage containers for starting questionable tubers. Ones where the quality maybe isn't so great but I'm desperate for more plants of that variety. They are perfect for creating a small, controlled environment. Often these tubers are smaller and/or a bit shriveled, they may also have questionable necks. This just allows me to keep an eye on them without having to worry about them drying out too quickly.

I've left the crown of each tuber exposed, as I mentioned previously, and placed a small skewer stick at the top of the crown. Honestly, sometimes because they're on the smaller side they just blend right in! And if a tuber should rot away the stick serves as a reminder that there was once a tuber there that I need to remove, to keep the rot from spreading to the next tuber. I will be honest, this does not have an overly high success rate, maybe 20%. This goes back to the importance of healthy tubers I mentioned in my previous post. I basically refer to this as my desperate, last ditch effort to save a variety that I cherish. Last year one of my new, and most favourite varieties displayed signs of leafy gall when I dug them up in Fall. I had to toss out three quarters of my tuber clumps, I was terribly disappointed. So there was no way I was tossing any of the handful of tubers I did manage to salvage. Thankfully this method has so far resulted in the "rescue" of two of the questionable ten tubers I saved, I've tossed four so far, leaving four that could still go either way. I do have other healthy tubers in this variety, so all is not lost even if these all do perish. But it's always nice to have extras of the ones we really love. I am ever the optimist so I will ALWAYS try this method with certain varieties.
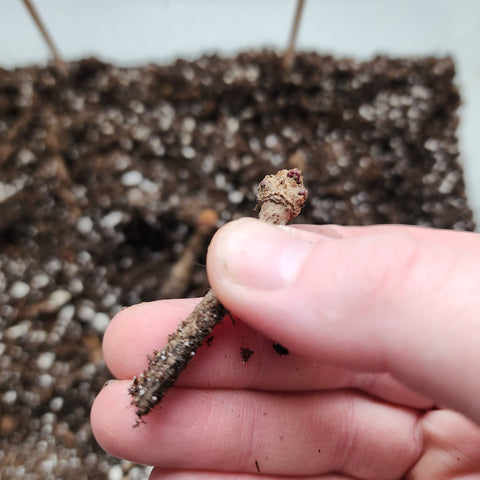
above left, one of the questionable tubers that has survived thus far, the eye has formed a generous bud and healthy roots have formed.
above right, this one started out looking like the one on the left but unfortunately the neck dried right out and the bottom half of the tuber rotted away. And even though the eyes look like they're still viable, they have dried right out.
---
CARING FOR YOUR POTTED TUBERS
There is no special equipment required to get your dahlias started, other than the addition of light and warmth. A sunny south or west window is sufficient, should you not have adequate natural light you may have to invest in grow lights to properly simulate sunlight once your dahlias really start to grow. During the early weeks it won't matter terribly much, even a north facing window will suffice. But once growth starts it will be difficult to keep the plants from getting leggy in insufficient light.
Dahlia tubers need little to no additional water when they are waking up. Overwatering leads quickly to rot so be mindful of this in the early weeks. If you're unsure, under-watering is the better option. Keep an eye on how your tubers are looking, if they're starting to shrivel, trying adding a little water to the soil. Pay close attention when starting your tubers in garden/seed starting trays. They dry out a lot quicker when using this method as they aren't planted in as much soil as in individual pots. Nothing is more disappointing than losing a tray or two of tubers because they've shriveled right up in the sunshine.
---
Thank you so much for taking the time to read through this post. I hope you've found something helpful within and if you have any questions please don't hesitate to reach out. Happy Planting!
Angelina


2 comments
Thank you for your kind words, Jenna! I am happy the post has helped! :)
This post is detailed and thorough, answered all my starter questions. Thanks Angelina!